Tuesday 24 February 2009

Night-time update

Just a quick update to show how the experiments with 'night-time effects' are going. This effect uses a simple additive material applied to the night node of the house. The night node gets switched on or off depending on whay time of day it is.

I particularly like the effectiveness of the wall light on the side of the house. Once again. it's a simple effect, with the additive floor glow sliced in half and placed part on the floor, and part on the wall.

Sunday 22 February 2009

Truck update

The road truck is now setup and working as a driveable vehicle in Rail Simulator. I've also taken the base mesh of the road truck and created a racing truck from it. Removal of the roof aerofoil and a quick re-skin made it a very quick job. I now need to do a proper skin for the truck and trailer instead of the placeholder. Here's a max render showing the two truck types.

The articulation between the truck and trailer works a treat as can be seen in this screenshot from the game.

You may also notice, that I've added two 'small' exhaust pipes behind the cabin on both truck types. These have smoke emitters attached which were easily placed and linked as children in the asset editor.

Tuesday 17 February 2009

I like trucking

I like trucking, and I like to truck.

Earlier today, over a coffee and a biscuit, it suddenly dawned on me that Rail Simulator would be perfect for articulated trucks. Think of a simple loco towing a single wagon and you've got the truck and the trailer.

Imagine selecting your truck, then reversing the truck into the trailer park to pick-up your trailer (using the couplings) before you then drive off in your truck with your trailer in tow.

Saturday 14 February 2009

Screenshots of Suburbia

I thought it was about time for me to create a few screenshots showing a more complete scene rather than showing more individual assets. Working without any schedule, it's easy to start to drift into creating random assets, and I find creating these little scenes every now and again helps me to focus. It also allows me to experiment with the setup/placement of assets, and it highlights which will be the easiest method for creating the routes efficiently.


You may notice a few characters in the screenshots. These are intentionally 'blocky' for two reasons: they match the art style, and they are generic enough to allow quick re-skins to create the variety that I want. I'll post more details on characters very soon.

I've created a 'fake' platform loft which I've placed alongside the road. This is used to control the spawning and placement of characters on the pavement. I've created a another loft for the pavement purely for the visuals. Creating a 'platform marker' along the nearby section of road allows the bus to pull up, and the passengers get on or off the bus.

Wednesday 11 February 2009

Fruity fruity

I've also created a smaller fruit tree as an animated scenery blueprint. This tree has the same gentle swaying animation as the larger tree, but with additional animated falling fruit.

Each tree has around six static fruit positioned around the base. Another fruit is animated to fall from the treetop to the ground using a simple looping animation.

This asset is really effective once multiple trees are placed alongside one another. In Rail Simulator, the 'auto-animations' all start on random frames, so in this case the fruit all fall at different times (and NOT all at the same time). Some of the falling fruit can be seen in this screenshot.

Monday 9 February 2009

Train and trees

Just a quick update the show the Class 166 amongst the trees. I'm pleased with the trees. Simple, cheap but effective.

You can't see it in these images, but in-game the trees sway gently in the breeze...


Tree

I'm now starting to think about assets other than the vehicles themselves. I'll create a number of items of foliage to add a bit of variety (trees, shrubs and hedges). Here is a tree to show the style I'm adopting for the trees.

The upper dome of the tree has and inner and an outer part (both elements using transparency at the bottom edge). The inner element is simply a smaller dome with inverted face normals and has a darker texture applied. I've also added a few stray leaves again using transparency. I've also applied a few keyframes to these trees to get them gently swaying.

The in-game tree should be very similar to the one seen above in the 3DSMax mock-up with one exception; the in-game stencil shadow will be a more simplified shape.

At the moment, I'm tempted to try the voxel approach for the hedges. I'll obviously show any progress with this idea on here. I'm also thinking of creating the hedges as two asset types; lofts and stand-alone assets.

Train - Class 166

I've finally got around to creating a locomotive for my world. This is the first vehicle I've created with bogies (as all the other vehicle blueprints I've used were referenced as fixed axle vehicles). It's slightly more complex setting up the bogies but nothing too difficult.

Now that this loco is complete, I realise in hindsight that I chose a tricky loco to stylise. As the real train is a simple tube with very little in the way of features, I found it difficult to add character to this super-deformed model. I've simply exaggerated the headlights, body width, shortened the length (by a long way) and gave the loco a beefed up exhaust. I'll add more in-game screenshots later.

Wednesday 4 February 2009

Aliens have landed...

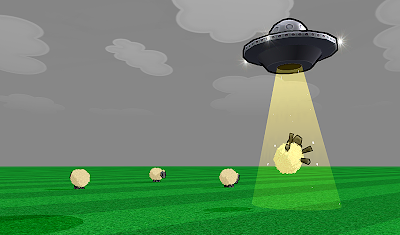
They have finally landed. And they are stealing our sheep.

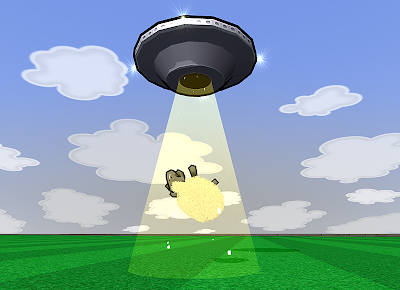
This UFO is a driveable vehicle, on a track (but this time the track is simply lowered below the terrain so that it's out of sight). I could of course create a new track which is invisible, but it might get messy when trying to find and select an invisible track should I wish to edit the placement.

I created a new 'flying' sheep which has a simple bobbing animation on it. This new sheep is linked to the UFO via a child reference in the vehicle blueprint. I could then easily adjust the height position of the sheep.

The UFO has a simple animation applied to it (it simply rotates and bobs about a bit). On the UFO itself, the lights flash using simple texture animation and the abductor beam below has additive alpha and simple scrolling UVs on it to move the dust particles upwards.

It's very simple, but works very well when animating in-game. I'll probably post more images when I get the time.

Now if only I had a crop circle...