
Here is the video as promised. The final route is a little rough around the edges, but the process remains the same.
Showing posts with label tech. Show all posts
Showing posts with label tech. Show all posts
Sunday, 17 January 2010

Sunday, 3 January 2010
Fir Tree
Another year, and another post. I had a bit of spare time over the holidays, enough to build a new tree. This fir tree has no stencil shadow, nor cel shaded outline. This was due to the use of transparency. I could have put the outline in the texture itself, but it looked too harsh and solid.
This shows the simple structure of the new fir tree. The tree uses the simple TexDiff shader with transparency to create the branches/needles.

This shows the simple structure of the new fir tree. The tree uses the simple TexDiff shader with transparency to create the branches/needles.

Tuesday, 20 October 2009
Editor Video - Creating 'le Tour'
Another editor video, this time showing how I created the Champs-Élysées route in RailWorks. This route is created within RailWorks using the in-game toolset. I've also created my own bespoke assets for the route and imported them via the supplied tools.
The steps in the video are :
- Go into Editor mode and create a circuit loop of cobbled road. This is a scenery loft and NOT a track loft. This is only used for the visuals, and the vehicles will not drive along this loft. This scenery loft has crash barriers populated along it.
- Place the Arc de Triomphe in the middle of a roundabout.
- Lay a few sections of scenery loft outwards from the roundabout, this time without any barriers populated along the length.
- Place a line of trees, copy them and place on the other side of the road.
- Lay a complete loop of invisible track. This is the track that the vehicles will actually drive along. Having this track seperate from the cobbled road allowes you to create a path where the vehicles do not always drive down the centre of the road. The invisible track is visible in the video to help with placement, but once you are happy with the layout, it can simply be made invisible through a texture swap.
- Position a collection of vehicles on the invisible track. I wanted gaps in between the cyclists, so I created an invisible vehicle. This invisible vehicle allows the entire group of vehicles to remain coupled together, but allowed for a visual gap between some of them.
- Populate the route with real 3D buildings and place some fake 2D buildings in the distance.
- Place the Eiffel Tower.
- Position lots of clouds in the sky.
- Go into Drive mode and click on the group of vehicles. Start driving the vehicles.
- Press '1' to see the game from the 1st-person view.
- Et Voilà!
The steps in the video are :
- Go into Editor mode and create a circuit loop of cobbled road. This is a scenery loft and NOT a track loft. This is only used for the visuals, and the vehicles will not drive along this loft. This scenery loft has crash barriers populated along it.
- Place the Arc de Triomphe in the middle of a roundabout.
- Lay a few sections of scenery loft outwards from the roundabout, this time without any barriers populated along the length.
- Place a line of trees, copy them and place on the other side of the road.
- Lay a complete loop of invisible track. This is the track that the vehicles will actually drive along. Having this track seperate from the cobbled road allowes you to create a path where the vehicles do not always drive down the centre of the road. The invisible track is visible in the video to help with placement, but once you are happy with the layout, it can simply be made invisible through a texture swap.
- Position a collection of vehicles on the invisible track. I wanted gaps in between the cyclists, so I created an invisible vehicle. This invisible vehicle allows the entire group of vehicles to remain coupled together, but allowed for a visual gap between some of them.
- Populate the route with real 3D buildings and place some fake 2D buildings in the distance.
- Place the Eiffel Tower.
- Position lots of clouds in the sky.
- Go into Drive mode and click on the group of vehicles. Start driving the vehicles.
- Press '1' to see the game from the 1st-person view.
- Et Voilà!
Monday, 5 October 2009
Editor Video - Creating an F1 Circuit
I've created a very basic movie showing the construction of a simple racing circuit using the RailWorks toolset.
The steps in the video are :
- Enter editor mode and create a section of track
- Close the loop of track, remembering to use the weld tool.
- Using the offset tool, place two lofts along sections of two of the corners.
- Place a driveable vehicle on the track.
- Spray a new terrain texture down
- Modify the terrain shape
- Enter drive mode, and drive the vehicle along the track
- Enter editor mode, and add some more assets
- Enter drive mode once again and marvel at your new route :)
For this example, the track happens to be tarmac, and the locomotive happens to be a racing car. As I've said many times before, we don't need to restrict this simulation to locomotives on rail track. Use your imagination.
The steps in the video are :
- Enter editor mode and create a section of track
- Close the loop of track, remembering to use the weld tool.
- Using the offset tool, place two lofts along sections of two of the corners.
- Place a driveable vehicle on the track.
- Spray a new terrain texture down
- Modify the terrain shape
- Enter drive mode, and drive the vehicle along the track
- Enter editor mode, and add some more assets
- Enter drive mode once again and marvel at your new route :)
For this example, the track happens to be tarmac, and the locomotive happens to be a racing car. As I've said many times before, we don't need to restrict this simulation to locomotives on rail track. Use your imagination.
Thursday, 24 September 2009
Lighthouse on the Rocks
I've now started to use all the ideas I've had (most of which are on this blog somewhere) and put them all together in one route. That was always my intention to have a single route where I could freely drive many types of vehicle.
The latest asset I created over lunch today was a little animated lighthouse. This was for my coastal area, and works well placed amongst the rocks.
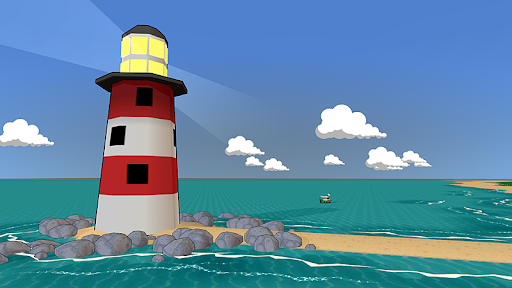
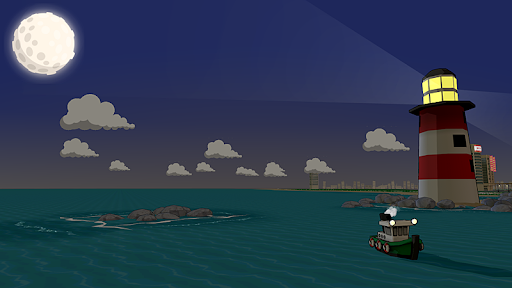
The light beam node has simple linear rotation, and uses a basic AddATex shader to create the light itself.
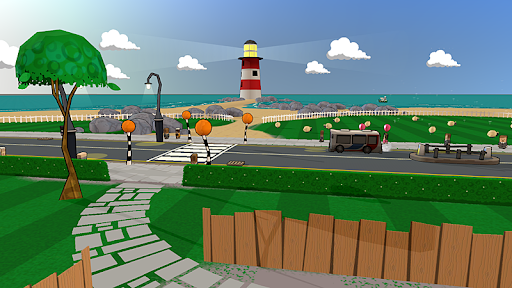
The latest asset I created over lunch today was a little animated lighthouse. This was for my coastal area, and works well placed amongst the rocks.


The light beam node has simple linear rotation, and uses a basic AddATex shader to create the light itself.

Tuesday, 15 September 2009
Runway Loft
My runway was created as a loft so that I could have a variety of lengths and curves if need be. This following runway asset was possible using the start, middle and end geometry of the loft.
The start and end geometry (the number 09) are the same asset, whilst the middle geometry was simply a pair of runway lights (this was so the lights appear on the left and right side of the runway itself).
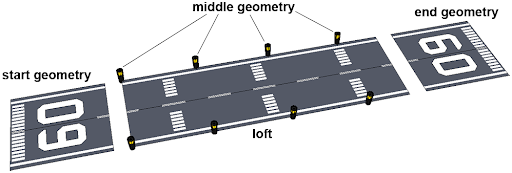
The start and end geometry (the number 09) are the same asset, whilst the middle geometry was simply a pair of runway lights (this was so the lights appear on the left and right side of the runway itself).

Monday, 14 September 2009
How to...Create "Editor-Only" Assets
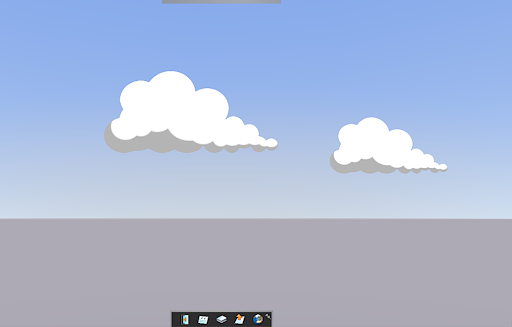
There is a blueprint available for use called the Editor shape blueprint, that will only be rendered in editor mode. I've used this blueprint to help with the selection of an awkwardly shaped asset. My new clouds are simply huge viewer facing polygons, and therefore I wanted to create a visible bounding box around the cloud asset to help with selection.
Firstly I created a generic bounding box.
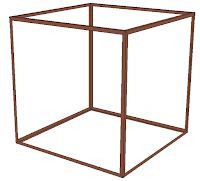
I then referenced this IGS in a "Editor shape blueprint". No visible friendly name is required here.
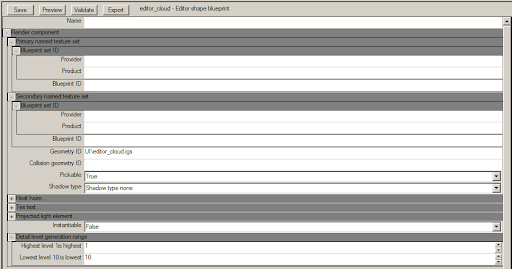
In the scenery blueprint for the cloud itself, I simply reference the "Editor shape blueprint" for the bounding box as a child object. So wherever a cloud is placed, a child object (the bounding box) is also placed.
Editor Mode:
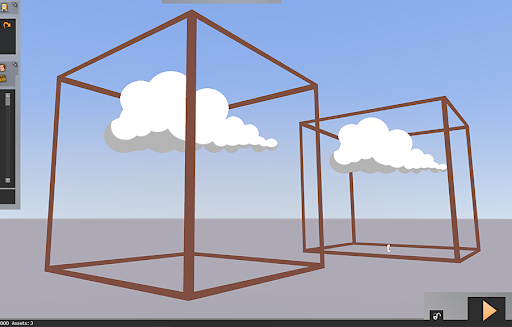
Drive mode:
Firstly I created a generic bounding box.

I then referenced this IGS in a "Editor shape blueprint". No visible friendly name is required here.

In the scenery blueprint for the cloud itself, I simply reference the "Editor shape blueprint" for the bounding box as a child object. So wherever a cloud is placed, a child object (the bounding box) is also placed.
Editor Mode:

Drive mode:

Friday, 19 June 2009
Dam Wall
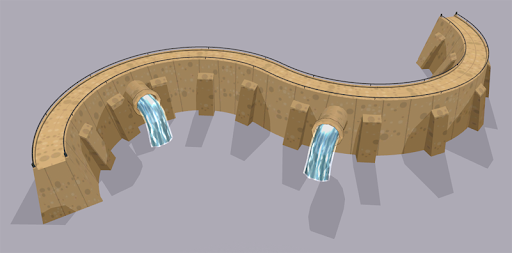
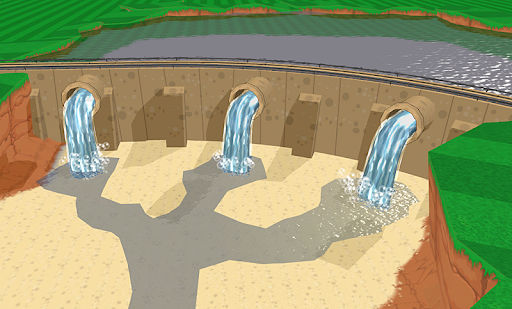
I've just built a new asset for a dam wall. This will easily allow me to have different areas of flat terrain at varying heights, and will allow impressive views from the top.
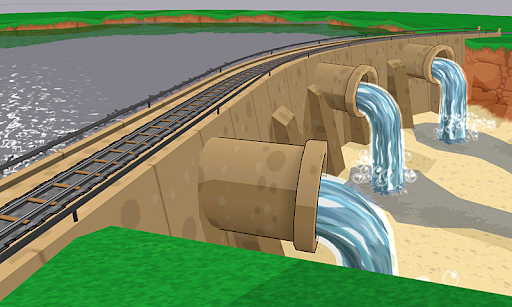
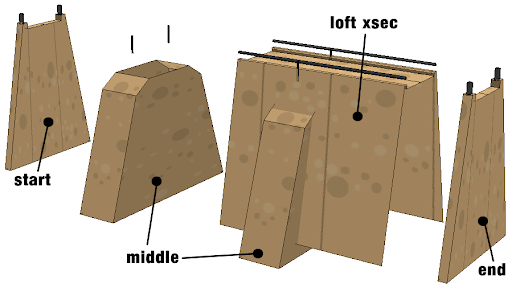
The dam consists of 4 assets:
-the wall and railing; created using a loft xsec
-the wall and railing end caps; positioned using start or end geometry references
-the wall supports; the middle geometry asset reference
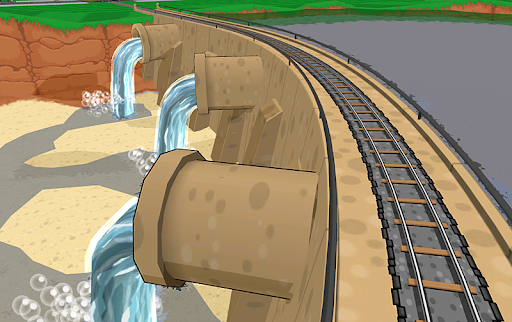
-the pipe outlet; a clutter asset positioned by hand
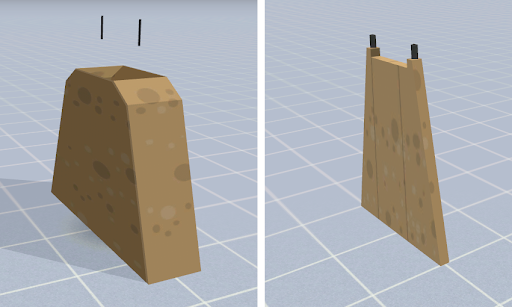
The Middle geometry and Start (and End) geometry.
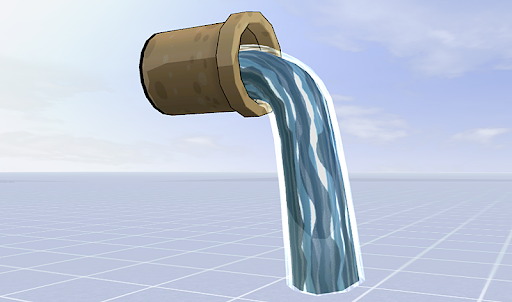
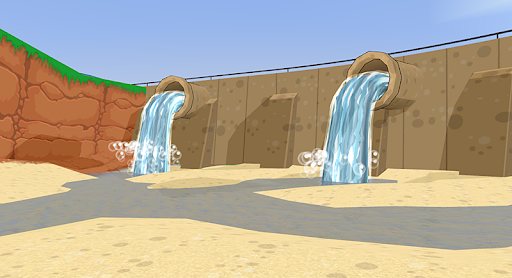
The pipe outlet. This asset has scrolling UV animation applied to get the water to appear to flow out of the pipe. I've also cheated by having two layers to the water. The inner layer does not animate, but has a specular material applied. This provides the base colour and highlight to the water. The outer layer has a simple additive material which has the scrolling water surface.
The complete loft.
I've also created a new particle effect which creates the bubbles at the base of the pipe outlet.

The dam consists of 4 assets:
-the wall and railing; created using a loft xsec
-the wall and railing end caps; positioned using start or end geometry references
-the wall supports; the middle geometry asset reference
-the pipe outlet; a clutter asset positioned by hand

The Middle geometry and Start (and End) geometry.

The pipe outlet. This asset has scrolling UV animation applied to get the water to appear to flow out of the pipe. I've also cheated by having two layers to the water. The inner layer does not animate, but has a specular material applied. This provides the base colour and highlight to the water. The outer layer has a simple additive material which has the scrolling water surface.

The complete loft.

I've also created a new particle effect which creates the bubbles at the base of the pipe outlet.


Tuesday, 16 June 2009
Animated Level Crossing
I was thinking recently about how to create an animating level crossing. Currently the codebase will need extending to get the crossing barriers to activate with an approaching train.
Here is my dirty hack (solution).
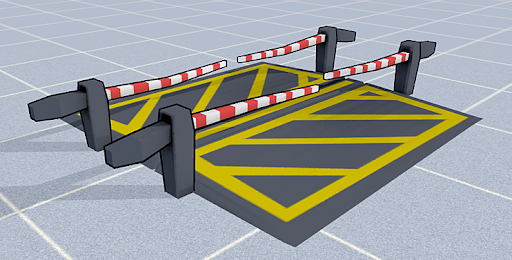
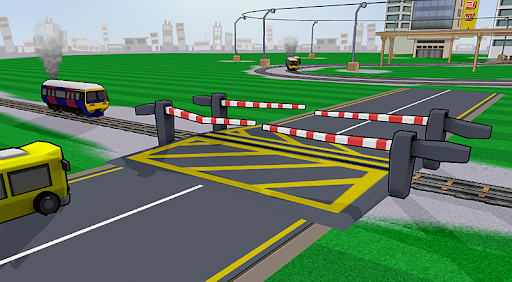
This is an entirely art based solution using LOD functionality. As we all know, the LOD code will swap geometry depending on distance to camera. So I've created a level crossing, where the gates are closed in the nearest LOD and open in the distant LOD. Currently, the gates pop between the open and closed positions, but many more LODs could be inserted between these two current LODs to make the gates move more smoothly.
Thinking along these lines, there could be many other uses for the LOD functionality:
- Static people, who start waving as the train or camera gets near
- Grazing cows, who look up as the camera or train gets near
I'm sure there are other uses than simply using LODs to swap different resolutions of geometry.
Here is my dirty hack (solution).

This is an entirely art based solution using LOD functionality. As we all know, the LOD code will swap geometry depending on distance to camera. So I've created a level crossing, where the gates are closed in the nearest LOD and open in the distant LOD. Currently, the gates pop between the open and closed positions, but many more LODs could be inserted between these two current LODs to make the gates move more smoothly.
Thinking along these lines, there could be many other uses for the LOD functionality:
- Static people, who start waving as the train or camera gets near
- Grazing cows, who look up as the camera or train gets near
I'm sure there are other uses than simply using LODs to swap different resolutions of geometry.

Monday, 8 June 2009
Road Update
I've created a slightly improved road and road junction asset.
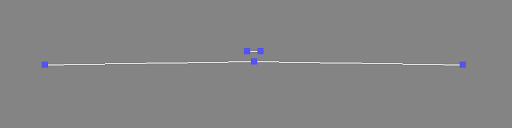 Previously the centre white line would break up as the polygons would intersect over the road junction. I've created a new cross-section which has the centre white line overlaid as polygons rather than a white stripe in the source texture. Now the centre white line polygons intersect cleanly without breakup.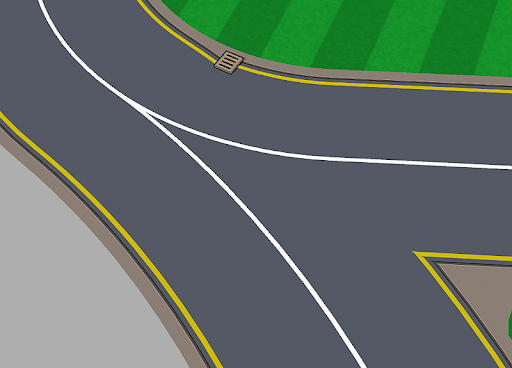
 Previously the centre white line would break up as the polygons would intersect over the road junction. I've created a new cross-section which has the centre white line overlaid as polygons rather than a white stripe in the source texture. Now the centre white line polygons intersect cleanly without breakup.
Wednesday, 13 May 2009
Sports Zone
Been very slow on here recently, due to working all hours. So very late last night, I decided to build a couple of new assets for myself.
The simple stadium and statue will be used in a recreational area/zone of the route. Looking at these shots this morning now makes me realise I'm gonna have to create a driveable blimp to hover over the stadium.
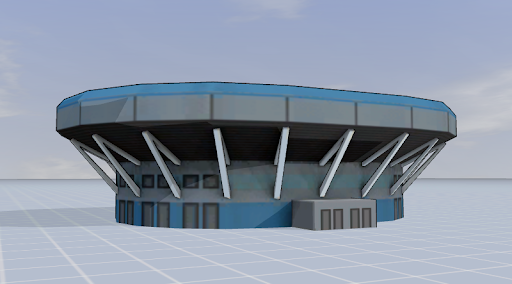
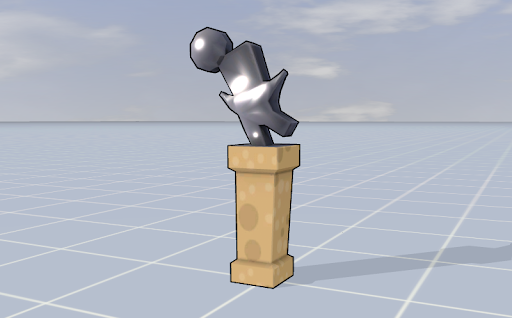
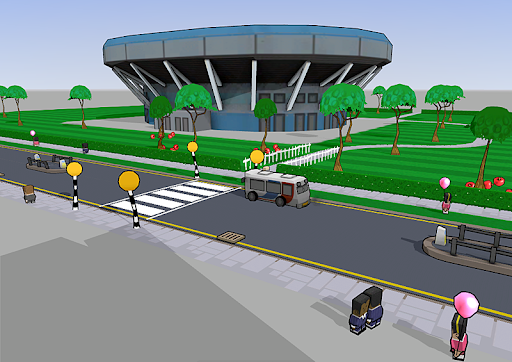 I'm quite pleased with the stadium at night. Using a simple 'Tex' material for the interior ensures it always looks lit regardless of the environment lighting. The floodlights and their glows are illuminated at night using 'night nodes'.
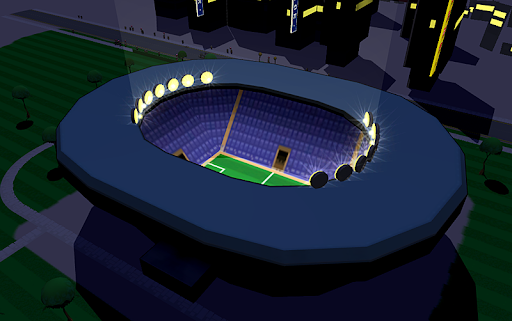
The simple stadium and statue will be used in a recreational area/zone of the route. Looking at these shots this morning now makes me realise I'm gonna have to create a driveable blimp to hover over the stadium.


 I'm quite pleased with the stadium at night. Using a simple 'Tex' material for the interior ensures it always looks lit regardless of the environment lighting. The floodlights and their glows are illuminated at night using 'night nodes'.
Saturday, 28 March 2009
Road Network
Recently, I have been trying to improve the complexity of the road layout by adding junction assets.
With rail track, this is a simple problem to solve, as the junction assets consist of two elements; ballast and rails. With roads however it required a bit of experimentation to come up with junction assets that would work correctly and provide the 'clean' look I was after.
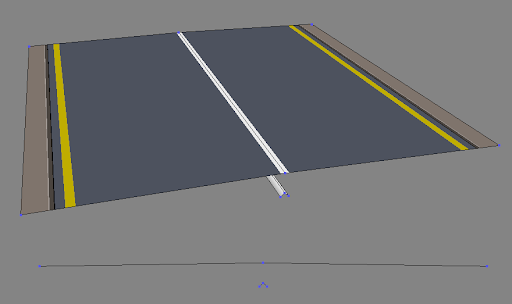
Here is the cross-section for the road junction asset. The junction asset must contain two nodes called 'Ballast' and 'Rail' (both case sensitive) for it to render correctly across the junction. In my road junction asset, you can see the 'Ballast' asset represents the tarmac, and the 'Rail' (not used in this case) is simply hidden below the road.
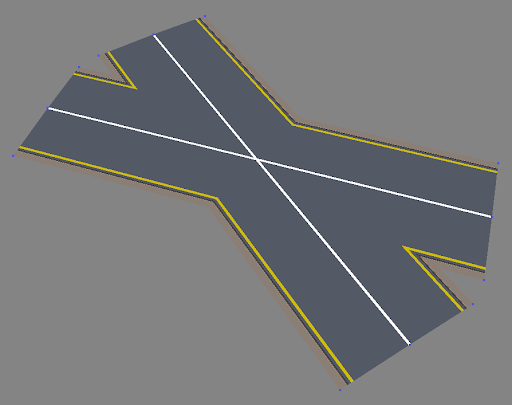
With a very subtle hump in the centre of the road (see the cross-section above), the road polygons cleanly intersect one another without any z-fighting issues.
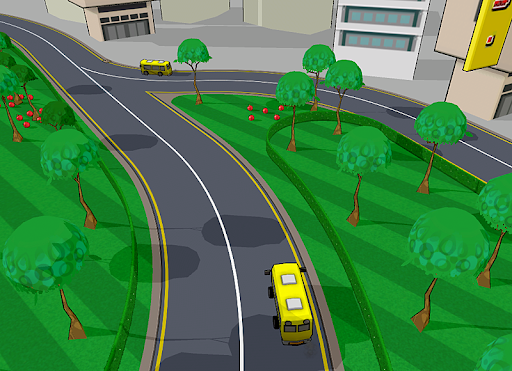
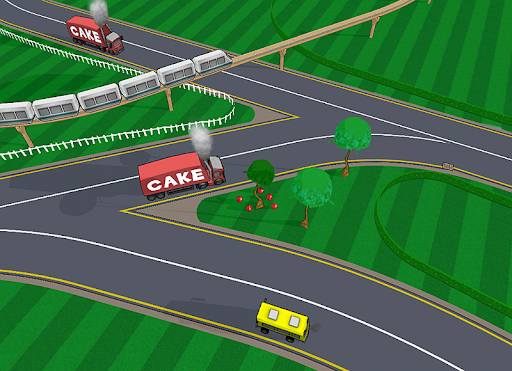
I've also placed small 'filler' assets at the apex of the internal corners to help with the visuals. This is the result in-game.
With rail track, this is a simple problem to solve, as the junction assets consist of two elements; ballast and rails. With roads however it required a bit of experimentation to come up with junction assets that would work correctly and provide the 'clean' look I was after.
Here is the cross-section for the road junction asset. The junction asset must contain two nodes called 'Ballast' and 'Rail' (both case sensitive) for it to render correctly across the junction. In my road junction asset, you can see the 'Ballast' asset represents the tarmac, and the 'Rail' (not used in this case) is simply hidden below the road.

With a very subtle hump in the centre of the road (see the cross-section above), the road polygons cleanly intersect one another without any z-fighting issues.

I've also placed small 'filler' assets at the apex of the internal corners to help with the visuals. This is the result in-game.


Monday, 23 March 2009
Monorail - Maglev
I'd always planned on creating a monorail as that type of vehicle would allow a higher viewpoint/perspective of the route below.
I'd seen some cool photos/movies of the 'Maglev' and a work colleague suggested I make one. This is my intepretation of it.

Once the main engine was built, to build the passenger cars (and I'll make no secret of this) I simply sliced the back-end off the model and mirrored it to create the passenger car. I won't be putting text on the sides of this loco so it didn't matter that the mapping was mirrored front to back. It's a very dirty and cheap method, but works perfectly in this instance.

The track was a simple loft cross-section asset with the concrete support posts setup as population geometry.

I'd seen some cool photos/movies of the 'Maglev' and a work colleague suggested I make one. This is my intepretation of it.

Once the main engine was built, to build the passenger cars (and I'll make no secret of this) I simply sliced the back-end off the model and mirrored it to create the passenger car. I won't be putting text on the sides of this loco so it didn't matter that the mapping was mirrored front to back. It's a very dirty and cheap method, but works perfectly in this instance.

The track was a simple loft cross-section asset with the concrete support posts setup as population geometry.

Distant Buildings
As I don't intend on building a vast huge sprawling route (this route will be small and detailed), I needed a cheap asset that I could place in the distance and give the illusion of distant objects. This seems to work well. I opted for a scenery object rather than a loft because I wanted night nodes that would illuminate the windows at night.

Here is the single asset. It's a single polygon and uses a texture with transparency.


Here is the single asset. It's a single polygon and uses a texture with transparency.

Thursday, 5 March 2009
Seasonal variations
Just a quick test to see how things look at night-time and during winter. Below are three screenshots showing the same scene at different times of day, during summer and winter seasons. The path and snow-mounds are part of the house model, so it makes for easy placement in the route.


Wednesday, 11 February 2009
Fruity fruity
I've also created a smaller fruit tree as an animated scenery blueprint. This tree has the same gentle swaying animation as the larger tree, but with additional animated falling fruit.
Each tree has around six static fruit positioned around the base. Another fruit is animated to fall from the treetop to the ground using a simple looping animation.
This asset is really effective once multiple trees are placed alongside one another. In Rail Simulator, the 'auto-animations' all start on random frames, so in this case the fruit all fall at different times (and NOT all at the same time). Some of the falling fruit can be seen in this screenshot.

Each tree has around six static fruit positioned around the base. Another fruit is animated to fall from the treetop to the ground using a simple looping animation.
This asset is really effective once multiple trees are placed alongside one another. In Rail Simulator, the 'auto-animations' all start on random frames, so in this case the fruit all fall at different times (and NOT all at the same time). Some of the falling fruit can be seen in this screenshot.

Monday, 9 February 2009
Tree
I'm now starting to think about assets other than the vehicles themselves. I'll create a number of items of foliage to add a bit of variety (trees, shrubs and hedges). Here is a tree to show the style I'm adopting for the trees.

The upper dome of the tree has and inner and an outer part (both elements using transparency at the bottom edge). The inner element is simply a smaller dome with inverted face normals and has a darker texture applied. I've also added a few stray leaves again using transparency. I've also applied a few keyframes to these trees to get them gently swaying.
The in-game tree should be very similar to the one seen above in the 3DSMax mock-up with one exception; the in-game stencil shadow will be a more simplified shape.
At the moment, I'm tempted to try the voxel approach for the hedges. I'll obviously show any progress with this idea on here. I'm also thinking of creating the hedges as two asset types; lofts and stand-alone assets.

The upper dome of the tree has and inner and an outer part (both elements using transparency at the bottom edge). The inner element is simply a smaller dome with inverted face normals and has a darker texture applied. I've also added a few stray leaves again using transparency. I've also applied a few keyframes to these trees to get them gently swaying.
The in-game tree should be very similar to the one seen above in the 3DSMax mock-up with one exception; the in-game stencil shadow will be a more simplified shape.
At the moment, I'm tempted to try the voxel approach for the hedges. I'll obviously show any progress with this idea on here. I'm also thinking of creating the hedges as two asset types; lofts and stand-alone assets.
Thursday, 22 January 2009
How to...Use the Offset Tool
This tool allows a loft to be 'offset' by a set distance, and placed in parallel with an existing loft. This is very handy for getting multiple lofts in perfect allignment, even when the original loft has complex curves in it.
Method
- Place a loft in your route
- Using the 'select' tool, highlight a section of loft
- Now click on the 'offset' tool
- Two new gizmos appear either side of the original loft, at a specified distance (which can be changed)
- Choose a new loft from the browser book
- Click on either of the two new gizmos (left and right of the original loft) depending on which side you wish your new loft to appear
- The new loft will now appear in the correct place
Your new loft will now be placed at an 'offset' distance from the centre of the original loft and will follow for the length of the highlighted section of the original loft.
In this example I wanted to create a simple racing circuit using a road loft.
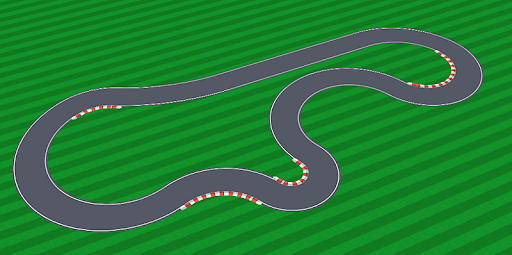
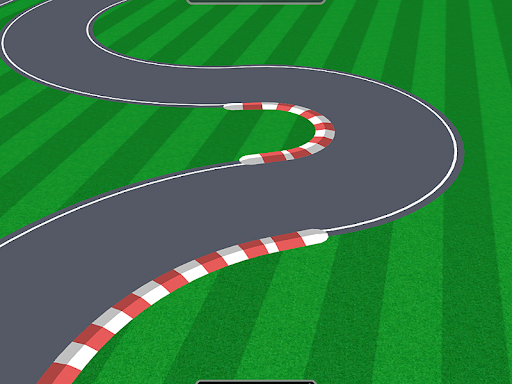
I have also created a loft to represent a rumble strip to be placed on the inside of sharp corners. This loft also has 'start' and 'end' geometry pieces to cap-off the ends of the rumble strip.
Method
- Place a loft in your route
- Using the 'select' tool, highlight a section of loft
- Now click on the 'offset' tool
- Two new gizmos appear either side of the original loft, at a specified distance (which can be changed)
- Choose a new loft from the browser book
- Click on either of the two new gizmos (left and right of the original loft) depending on which side you wish your new loft to appear
- The new loft will now appear in the correct place
Your new loft will now be placed at an 'offset' distance from the centre of the original loft and will follow for the length of the highlighted section of the original loft.
In this example I wanted to create a simple racing circuit using a road loft.

I have also created a loft to represent a rumble strip to be placed on the inside of sharp corners. This loft also has 'start' and 'end' geometry pieces to cap-off the ends of the rumble strip.

Wednesday, 21 January 2009
How to...Use Seasonal Textures
Rail Simulator supports seasonal textures, and it's a fairly straight forward idea to swap one texture for another depending on the season.
For example a brick wall might have two textures;
"brick_wall_01.ace" - the default texture
"brick_wall_01_wi.ace" - the winter version
In this example, the wall should be mapped using "brick_wall_01.ace". If any seasonal variants are required, the seasonal textures should be created in the same folder. Please see the DEV area of the Rail Simulator website for more detailed information.
Then once your wall asset is exported, the default textures AND your seasonal texture variants will be compiled. NOTE: If any additional textures are added, then the IGS for the asset must be re-exported to pick up these new textures.
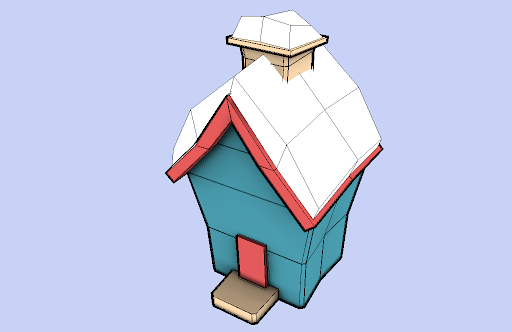
In my previous post showing a concept image for a winter house, I wanted to change the outline colour depending on season. In this case, simple seasonal texture swapping was used.
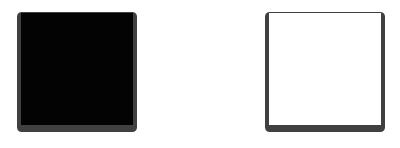
See below. The black texture on the left is called "outline.ace", and the white texture on the right is called "outline_wi.ace". In any season other than winter, the outline is black. In winter, the outline is white.
However, we can also do something cool if we consider a material with TRANSPARENCY.
In the following example, the house has a mound of snow on the roof. The texture for the snow mound has two seasonal variants:
"winter_snow_mound.ace" - default texture
"winter_snow_mound_wi.ace" - winter version
Here's the clever bit.
The material for the snow is a simple 'TexDiff' shader but with the transparency flag in the shader set to TRANS.
The default texture is created so that it is fully transparent (fully black). And as it is used on a TRANS shader, it will appear invisible in the game. In any other season other than winter, it will look like this.
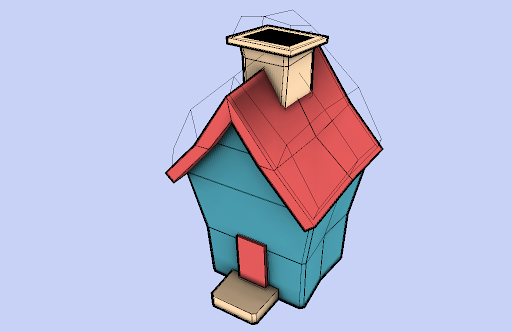
The winter version of the snow mound texture is an opaque white snowy texture (not transparent). This WILL appear in the game.
So we now have a method of making geometry appear and disappear depending on the season.
How about
- Hay bails only appearing in the summer
- Snowmen only appearing in the winter
You get the idea.
For example a brick wall might have two textures;
"brick_wall_01.ace" - the default texture
"brick_wall_01_wi.ace" - the winter version
In this example, the wall should be mapped using "brick_wall_01.ace". If any seasonal variants are required, the seasonal textures should be created in the same folder. Please see the DEV area of the Rail Simulator website for more detailed information.
Then once your wall asset is exported, the default textures AND your seasonal texture variants will be compiled. NOTE: If any additional textures are added, then the IGS for the asset must be re-exported to pick up these new textures.
In my previous post showing a concept image for a winter house, I wanted to change the outline colour depending on season. In this case, simple seasonal texture swapping was used.
See below. The black texture on the left is called "outline.ace", and the white texture on the right is called "outline_wi.ace". In any season other than winter, the outline is black. In winter, the outline is white.

However, we can also do something cool if we consider a material with TRANSPARENCY.
In the following example, the house has a mound of snow on the roof. The texture for the snow mound has two seasonal variants:
"winter_snow_mound.ace" - default texture
"winter_snow_mound_wi.ace" - winter version
Here's the clever bit.
The material for the snow is a simple 'TexDiff' shader but with the transparency flag in the shader set to TRANS.
The default texture is created so that it is fully transparent (fully black). And as it is used on a TRANS shader, it will appear invisible in the game. In any other season other than winter, it will look like this.

The winter version of the snow mound texture is an opaque white snowy texture (not transparent). This WILL appear in the game.

So we now have a method of making geometry appear and disappear depending on the season.
How about
- Hay bails only appearing in the summer
- Snowmen only appearing in the winter
You get the idea.
Friday, 16 January 2009
Canal loft
Onto something a bit more interesting with water based transport. Once again the same principles will be used; this time we swap the train for a boat, and the rails for a canal. Underneath, it's still a vehicle moving along a path.
I wanted reflections on my canal loft, so I ended up doing things slightly differently. Unlike the default Rail Simulator assets, I created my loft with no water shader assigned to it. The loft was simply a hollow channel.

Once this empty loft is laid in the route, I can place a number of 'scalable' water quads over the top to fill my canal with reflective water.
I wanted reflections on my canal loft, so I ended up doing things slightly differently. Unlike the default Rail Simulator assets, I created my loft with no water shader assigned to it. The loft was simply a hollow channel.

Once this empty loft is laid in the route, I can place a number of 'scalable' water quads over the top to fill my canal with reflective water.
Subscribe to:
Posts (Atom)