Thursday 29 January 2009

Voxel Sheep

These are the latest addition to my ever growing browser book. As you can see, I've used the 'faked' voxel technique (described here) for their wooly coats, and I'm pleased with the result.

And another screenshot showing the new egg yolk sun texture.

Wednesday 28 January 2009

Clocks

I've been playing around with the environmental assets of my RailSimilarity world. I've created new stylised artwork for the following assets: cloud layers, sun, moon

To make my job easier I modified the 'time scaler' function in the 'Time Of Day' blueprint. This value simply accelerates or decelerates the day cycle (the transition from day to night and back again). The default value for this is 1, but I've set mine to 500 to speed things up a bit. So much so, the sun and moon speed across the sky in a comical fashion, and the stencil shadows move dynamically across the terrain.

And as Rail Simulator supports realtime clocks (which tell the correct in-game time), as a little side task I created myself a clock asset to place in the route. That way I could easily see the in-game time of day as I was experimenting.

The sky at 5:33pm


The sky at 9:32pm

Tuesday 27 January 2009

Racing Circuit Screenshots

And here are a few in-game screenshots showing the Lotus out on the track. Notice the twin exhaust particle emitters.

Formula 1 - Lotus type 49b

Here's a fun little racer for use in Rail Simulator. Once again, the vehicle was very quick to build and the petrolheads amongst you will have spotted that it's based on the Lotus type 49b. Here are a few renders taken from 3DSMax.

The racing track lofts for this vehicle were detailed in a previous post. The plan is to include this racing circuit as a small section of my route, complete with grandstand, pitlane and of course a Dunlop bridge.

Thursday 22 January 2009

How to...Use the Offset Tool

This tool allows a loft to be 'offset' by a set distance, and placed in parallel with an existing loft. This is very handy for getting multiple lofts in perfect allignment, even when the original loft has complex curves in it.

Method

- Place a loft in your route
- Using the 'select' tool, highlight a section of loft
- Now click on the 'offset' tool
- Two new gizmos appear either side of the original loft, at a specified distance (which can be changed)
- Choose a new loft from the browser book
- Click on either of the two new gizmos (left and right of the original loft) depending on which side you wish your new loft to appear
- The new loft will now appear in the correct place

Your new loft will now be placed at an 'offset' distance from the centre of the original loft and will follow for the length of the highlighted section of the original loft.

In this example I wanted to create a simple racing circuit using a road loft.

I have also created a loft to represent a rumble strip to be placed on the inside of sharp corners. This loft also has 'start' and 'end' geometry pieces to cap-off the ends of the rumble strip.

Wednesday 21 January 2009

Winter screenshots

Here are two screenshots showing the seasonal texture variants. Notice how the mounds of snow appear on the roof during the winter season.

How to...Use Seasonal Textures

Rail Simulator supports seasonal textures, and it's a fairly straight forward idea to swap one texture for another depending on the season.

For example a brick wall might have two textures;

"brick_wall_01.ace" - the default texture
"brick_wall_01_wi.ace" - the winter version

In this example, the wall should be mapped using "brick_wall_01.ace". If any seasonal variants are required, the seasonal textures should be created in the same folder. Please see the DEV area of the Rail Simulator website for more detailed information.

Then once your wall asset is exported, the default textures AND your seasonal texture variants will be compiled. NOTE: If any additional textures are added, then the IGS for the asset must be re-exported to pick up these new textures.

In my previous post showing a concept image for a winter house, I wanted to change the outline colour depending on season. In this case, simple seasonal texture swapping was used.

See below. The black texture on the left is called "outline.ace", and the white texture on the right is called "outline_wi.ace". In any season other than winter, the outline is black. In winter, the outline is white.

However, we can also do something cool if we consider a material with TRANSPARENCY.

In the following example, the house has a mound of snow on the roof. The texture for the snow mound has two seasonal variants:

"winter_snow_mound.ace" - default texture
"winter_snow_mound_wi.ace" - winter version

Here's the clever bit.

The material for the snow is a simple 'TexDiff' shader but with the transparency flag in the shader set to TRANS.

The default texture is created so that it is fully transparent (fully black). And as it is used on a TRANS shader, it will appear invisible in the game. In any other season other than winter, it will look like this.

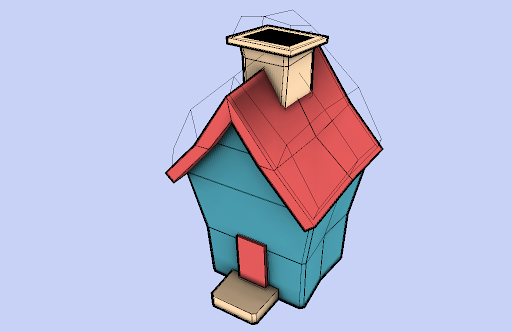
The winter version of the snow mound texture is an opaque white snowy texture (not transparent). This WILL appear in the game.

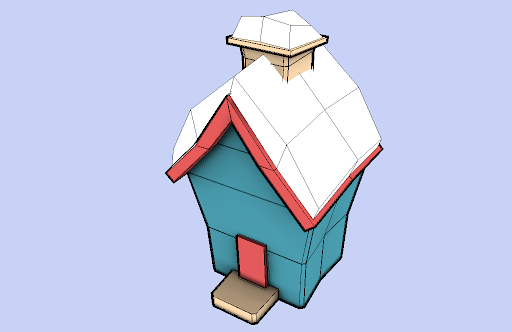
So we now have a method of making geometry appear and disappear depending on the season.

How about
- Hay bails only appearing in the summer
- Snowmen only appearing in the winter

You get the idea.

Tuesday 20 January 2009

Winter house

Here is the first render showing how the buildings will look in this art-style. I've also just been playing with an idea on how to improve the look of the game during winter.

Rail Simulator supports texture swapping for the 4 seasons, and there's no reason why with some clever texture naming we couldn't re-create the following example.

The house on the left (Summer variant) has the black outline with no snow build-up. The house on the right (Winter variant) now has a white outline (black outlines wouldn't look good in the winter), with a 3D build-up of snow on the roof.

Sunday 18 January 2009

More tugboat screenshots

Here are a few more screenshots showing the tugboat on the canal.


Saturday 17 January 2009

Canal and tugboat screenshots

The tugboat is now in Rail Simulator as a driveable boat. I'm pleased with how quick I can get new driveable vehicles into the game.

Adding the reflective water to the water loft (as seperate objects) was also very quick and easy and it creates a far more interesting water surface. I think the only thing now missing from the canal is a shopping trolley.

I've included a few screenshots here. More will follow soon.


Tugboat images

I decided on a little tugboat for the water based transport. I found it very easy when modelling the tugboat to get a lot of 'character' into the boat. After all it's such a small cute boat to start with.

Here are a few 3DSMax renders of the tugboat.


Because the cel shaded technique is very simple and it can be applied to any 3D engine, it allows the effect to be renderable in 3DSMax. Here is the boat with mapping and shadow baking (pre-lighting) applied taken straight from 3DSMax.

Friday 16 January 2009

The canal

At the moment, the plans are to make the canal lock a static asset i.e. it won't be functional at all. Obviously when I place the gates in my route, I'll place then in the open position.

Here is a 3DSMax render of what it will look like (lacking the in-game reflections of course.)

Canal lock gate

Here is a 3DMax render of the gate. It's difficult to see from this image but if you look at the foot-planks, you'll notice that I've made this gate symmetrical. This was done intentionally so that the same gate asset can be placed on each side of the canal (with one of the assets rotated 180 degrees).

Canal loft

Onto something a bit more interesting with water based transport. Once again the same principles will be used; this time we swap the train for a boat, and the rails for a canal. Underneath, it's still a vehicle moving along a path.

I wanted reflections on my canal loft, so I ended up doing things slightly differently. Unlike the default Rail Simulator assets, I created my loft with no water shader assigned to it. The loft was simply a hollow channel.

Once this empty loft is laid in the route, I can place a number of 'scalable' water quads over the top to fill my canal with reflective water.

How to...Animate Scrolling UVs

This describes how to scroll UV co-ordinates on a material in 3DSMax using the Rail Simulator tools. Once a polygon or groups of polygons are mapped with UV co-ordinates, these co-ordinates can be scrolled. In this case, the texture doesn't change, it simply 'slides' across the surface at a given speed and in a given direction.

Examples of this type of animation would be:

- The lavaflow from a volcano down a mountainside
- Waves at a beach
- Falling water in a waterfall
- Scrolling text on a dot matrix board

This feature is ony supported on some of the simpler shaders (for example TexDiff, AddATex).

To get this working, browse the material roll-out and find the 'UV Special Effects' area of the material. Simply tick the 'Scroll UVs' button, and specify a scrolling speed in U and V. Which values to specify for these two speeds depends on how the polygons are mapped in the first place. Try it out for yourself.

Tuesday 13 January 2009

Animated traffic cones

Using the technique described in a previous post, I've created a simple traffic cone with a nice flashing light on top.

The flashing light was a 4 frame animation; frame 1 being ON (the flash), and frames 2,3 and 4 being OFF (each one was a fully transparent texture). I wanted these extra 'OFF' frames to extend the time over which the light was 'OFF'.

It looked great initially, but once I'd placed a number of these down in the scene it looked a little odd as they were all flashing in perfect sequence.

As a quick solution for this, I created two identical cones, but varied their animation setup so that they animate at different rates. Here are some screenshots.

How to...Animate Textures

Rail Simulator supports animated textures. Animated textures refer to a series of identically sized frames or textures which the game will load and display frame-by-frame. Some examples of animated textures would be :

- traffic light sequence
- flashing lights on a police car

The process is fairly straight-forward. The engine relies of the fact that the frames are named sequentially, and once the material is set up to animate, it will loop through these sequentially named frames at a given speed.

Here, in this example, we will setup a simple 4 frame animation.

1. Intially create the sequence of 4 frames and name then as follows:
XXXXX_anim1.ace, XXXXX_anim2.ace, XXXXX_anim3.ace, XXXXX_anim4.ace etc (where XXXXX is the texture name).

2. In 3DSMax, assign a simple shader such as TexDiff (or AddATex for glows) to the relevent polygon or mesh. Then in the material, point the texture slot to the first texture XXXXX_anim1.ace. It's important to point to the first texture so the game engine knows where to start the sequence.

3. Still in the material editor, scroll down to find the "UV Special Effects" area, and tick the "texture is animated" button. Also insert the correct number of frames for your animation in the area marked '#frames' (in our example this would be 4). Also choose a frame rate in the 'frames per second'. In our example we'll choose 2.

4. Export the shape.

NOTE : The export process will only compile the textures that are referenced in the scene IGS file. As we only reference the starting frame (XXXXX_anim1.ace) in our IGS, only this single frame of the animation will compile. If we view this in the game, we will see the first frame OK but the other frames will be represented as "MISSING TEXTURES". There is a simple solution to this where we can simply force the missing textures to compile from within the blueprint editor. To do this, navigate to find your textures in the blueprint editor and one by one right-click on each one and choose the 'export' option from the rollout. Once all the textures have been compiled, the shape will be ready to be viewed in-game.

Sunday 11 January 2009

Voxel track ballast

Here's a quick idea I had taking the previously discussed voxel technique and applying it to the ballast in Rail Simulator. This creates a more realistic looking '3D' ballast, especially if you notice the area around the sleepers where you can even make out individual stone chips.

Here's a simple animated GIF to show the ballast with and without the voxel effect applied. In the following example, I've only created the voxel effect around the sleepers (and hence why it's the only area of the ballast that changes in the image). Obviously if this was going into a route, I'd apply the voxel effect to the entire ballast section.

Saturday 10 January 2009

Voxels in Rail Simulator

Following on from the 3DSMax 'voxel' tutorial, here are a few of those elements exported as a single scenery asset in Rail Simulator. For the purpose of the example, I've only created a stencil shadow for the cube.

After closer inspection, I was particularly pleased how the stencil shadow worked over the 'voxel layers' of the terrain.

Friday 9 January 2009

How to...Create Voxels

Over the years, I've always been fascinated by Voxels.

Many moons ago, before the time when 3D engines could render a gazillion multi-layered triangles per second, things were pretty basic. 3D terrain would always look flat, basic and angular. At the time, Voxels were used as a neat way of adding detail (roughness) to an otherwise flat polygonal landscape. See these examples over at Eric Chadwick's site.

Here is something that I was playing with a while back (but I think it's relevant to show it on here). This technique does NOT use actual voxels, but is similar in appearance.

Initially I mocked up the technique in 3DSMax to test how it would work. Below shows two simple quads, the first with a simple grass texture (which we will call the base layer), and the second quad with the same texture but this time with areas removed using simple transparency (which we will call the voxel layer).

Now imagine taking that base layer to represent the terrain, and stacking lots of those voxel layers on top of one another to form a column.

If small gaps are placed between the vertical spacing of these voxel layers, when looked from this angle it's easy to fool the eye into thinking that these elements are connected. This simple illusion allows this technique to work.

This technique can be applied to almost any surface, even spherical. When considering a spherical surface, the voxel layers are actually concentric spheres increasing in radius. Remember in 3DSMax, the 'PUSH' modifier can be used to create these layers.


Here is a little scene I created in Max, to demonstrate how those simple 'faked' voxels can easily be created in any 3D engine. Using multiple layers of polygons and transparency, this cute effect can be created.

Thursday 1 January 2009

Screenshots

These in-game screenshots are all captured within the Rail Simulator engine.