Showing posts with label 3DSMax render. Show all posts

Sunday, 3 January 2010

Fir Tree

Another year, and another post. I had a bit of spare time over the holidays, enough to build a new tree. This fir tree has no stencil shadow, nor cel shaded outline. This was due to the use of transparency. I could have put the outline in the texture itself, but it looked too harsh and solid.

This shows the simple structure of the new fir tree. The tree uses the simple TexDiff shader with transparency to create the branches/needles.

Friday, 23 October 2009

Tractor

I used to love tractors when I was a kid. So, you could say that I'm an ex-tractor fan. Sigh. I got a chance to finish a new vehicle earlier. Ok, here is a render of the tractor for my rural area.

Tuesday, 6 October 2009

Bicycle, Bicycle

Here's a sneak look at what's next. It had to arrive at some point, but finally a cyclist is soon to appear in my RailSimilarity world. The current plan is to create assets for an entire roadrace over the coming weeks. I've even given him a set of Mavics.

Tuesday, 15 September 2009

Runway Loft

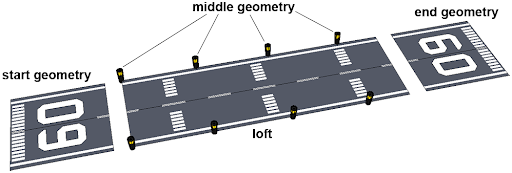
My runway was created as a loft so that I could have a variety of lengths and curves if need be. This following runway asset was possible using the start, middle and end geometry of the loft.
The start and end geometry (the number 09) are the same asset, whilst the middle geometry was simply a pair of runway lights (this was so the lights appear on the left and right side of the runway itself).


Tuesday, 5 May 2009

Road Clutter

In the middle of a very busy work period, I decided to give myself the first night off in many weeks. And what do I end up doing? Some new Rail Similarity assets. I sometimes feel like I'm married to 3DSMax.

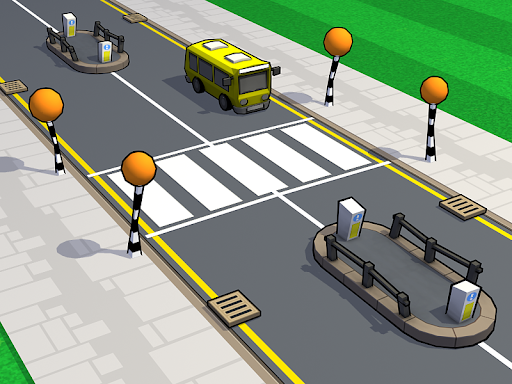
I've spent the last few hours knocking up these new clutter assets for the road network. Once again, simple assets and quick to make. The 'zebra crossing' beacons flash on and off using simple animated textures. The markings on the 'zebra crossing' are a simple quad overlay using transparency.

I've included a 3DSMax render to show them in their full glory.

Tuesday, 3 March 2009

Characters

Here is a render of some of the characters I've been working on. So far, I have created an old man, a couple of business men, a cyclist and a girl.

I'll be the first to admit, I'm not an animator. I don't know how to 'rig', paint vertex weights, or even create a realistic looking character mesh. I believe that whole area is a skillset in itself and if you've ever seen my animations, I think you'd agree that I'm wise leaving all that complicated stuff to those animator boys.

For Rail Similarity, I wanted a very simple character mesh, one that I could easily re-skin over and over, and one that even I could 'animate'. I chose a very old school approach, and made it from segmented nodes.

Because of their blocky appearance, the end result almost makes them look like papercraft (Pepakura). I must try making one of these characters out of paper at some point.

Once I'd mapped a single character mesh, the re-skins themselves were very easy to create. I'm pleased with the variety I can get from the single mesh. I have cheated though by adding a simple accessory to a few of the characters; umbrella, briefcase, balloon.

Here they are in Rail Simulator :

Sunday, 22 February 2009

Truck update

The road truck is now setup and working as a driveable vehicle in Rail Simulator. I've also taken the base mesh of the road truck and created a racing truck from it. Removal of the roof aerofoil and a quick re-skin made it a very quick job. I now need to do a proper skin for the truck and trailer instead of the placeholder. Here's a max render showing the two truck types.

The articulation between the truck and trailer works a treat as can be seen in this screenshot from the game.

You may also notice, that I've added two 'small' exhaust pipes behind the cabin on both truck types. These have smoke emitters attached which were easily placed and linked as children in the asset editor.

Tuesday, 17 February 2009

I like trucking

I like trucking, and I like to truck.

Earlier today, over a coffee and a biscuit, it suddenly dawned on me that Rail Simulator would be perfect for articulated trucks. Think of a simple loco towing a single wagon and you've got the truck and the trailer.

Imagine selecting your truck, then reversing the truck into the trailer park to pick-up your trailer (using the couplings) before you then drive off in your truck with your trailer in tow.

Monday, 9 February 2009

Tree

I'm now starting to think about assets other than the vehicles themselves. I'll create a number of items of foliage to add a bit of variety (trees, shrubs and hedges). Here is a tree to show the style I'm adopting for the trees.

The upper dome of the tree has and inner and an outer part (both elements using transparency at the bottom edge). The inner element is simply a smaller dome with inverted face normals and has a darker texture applied. I've also added a few stray leaves again using transparency. I've also applied a few keyframes to these trees to get them gently swaying.

The in-game tree should be very similar to the one seen above in the 3DSMax mock-up with one exception; the in-game stencil shadow will be a more simplified shape.

At the moment, I'm tempted to try the voxel approach for the hedges. I'll obviously show any progress with this idea on here. I'm also thinking of creating the hedges as two asset types; lofts and stand-alone assets.

Tuesday, 27 January 2009

Formula 1 - Lotus type 49b

Here's a fun little racer for use in Rail Simulator. Once again, the vehicle was very quick to build and the petrolheads amongst you will have spotted that it's based on the Lotus type 49b. Here are a few renders taken from 3DSMax.

The racing track lofts for this vehicle were detailed in a previous post. The plan is to include this racing circuit as a small section of my route, complete with grandstand, pitlane and of course a Dunlop bridge.

Wednesday, 21 January 2009

How to...Use Seasonal Textures

Rail Simulator supports seasonal textures, and it's a fairly straight forward idea to swap one texture for another depending on the season.

For example a brick wall might have two textures;

"brick_wall_01.ace" - the default texture
"brick_wall_01_wi.ace" - the winter version

In this example, the wall should be mapped using "brick_wall_01.ace". If any seasonal variants are required, the seasonal textures should be created in the same folder. Please see the DEV area of the Rail Simulator website for more detailed information.

Then once your wall asset is exported, the default textures AND your seasonal texture variants will be compiled. NOTE: If any additional textures are added, then the IGS for the asset must be re-exported to pick up these new textures.

In my previous post showing a concept image for a winter house, I wanted to change the outline colour depending on season. In this case, simple seasonal texture swapping was used.

See below. The black texture on the left is called "outline.ace", and the white texture on the right is called "outline_wi.ace". In any season other than winter, the outline is black. In winter, the outline is white.

However, we can also do something cool if we consider a material with TRANSPARENCY.

In the following example, the house has a mound of snow on the roof. The texture for the snow mound has two seasonal variants:

"winter_snow_mound.ace" - default texture
"winter_snow_mound_wi.ace" - winter version

Here's the clever bit.

The material for the snow is a simple 'TexDiff' shader but with the transparency flag in the shader set to TRANS.

The default texture is created so that it is fully transparent (fully black). And as it is used on a TRANS shader, it will appear invisible in the game. In any other season other than winter, it will look like this.
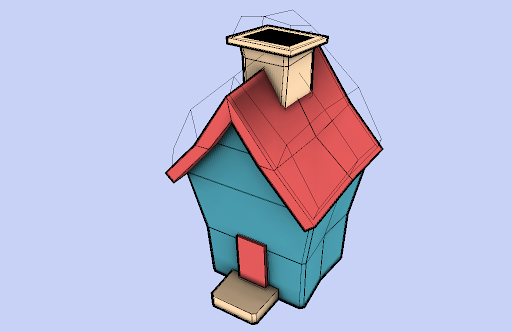
The winter version of the snow mound texture is an opaque white snowy texture (not transparent). This WILL appear in the game.
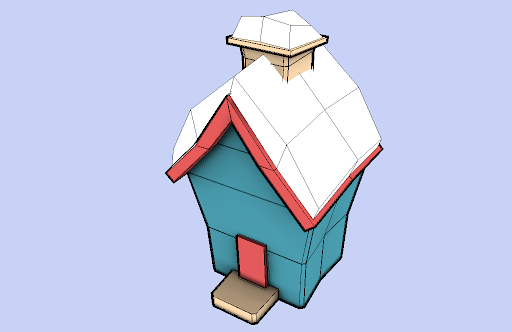
So we now have a method of making geometry appear and disappear depending on the season.

How about
- Hay bails only appearing in the summer
- Snowmen only appearing in the winter

You get the idea.

Tuesday, 20 January 2009

Winter house

Here is the first render showing how the buildings will look in this art-style. I've also just been playing with an idea on how to improve the look of the game during winter.

Rail Simulator supports texture swapping for the 4 seasons, and there's no reason why with some clever texture naming we couldn't re-create the following example.

The house on the left (Summer variant) has the black outline with no snow build-up. The house on the right (Winter variant) now has a white outline (black outlines wouldn't look good in the winter), with a 3D build-up of snow on the roof.

Saturday, 17 January 2009

Tugboat images

I decided on a little tugboat for the water based transport. I found it very easy when modelling the tugboat to get a lot of 'character' into the boat. After all it's such a small cute boat to start with.

Here are a few 3DSMax renders of the tugboat.


Because the cel shaded technique is very simple and it can be applied to any 3D engine, it allows the effect to be renderable in 3DSMax. Here is the boat with mapping and shadow baking (pre-lighting) applied taken straight from 3DSMax.

Friday, 16 January 2009

The canal

At the moment, the plans are to make the canal lock a static asset i.e. it won't be functional at all. Obviously when I place the gates in my route, I'll place then in the open position.

Here is a 3DSMax render of what it will look like (lacking the in-game reflections of course.)

Canal lock gate

Here is a 3DMax render of the gate. It's difficult to see from this image but if you look at the foot-planks, you'll notice that I've made this gate symmetrical. This was done intentionally so that the same gate asset can be placed on each side of the canal (with one of the assets rotated 180 degrees).

Canal loft

Onto something a bit more interesting with water based transport. Once again the same principles will be used; this time we swap the train for a boat, and the rails for a canal. Underneath, it's still a vehicle moving along a path.

I wanted reflections on my canal loft, so I ended up doing things slightly differently. Unlike the default Rail Simulator assets, I created my loft with no water shader assigned to it. The loft was simply a hollow channel.

Once this empty loft is laid in the route, I can place a number of 'scalable' water quads over the top to fill my canal with reflective water.

Sunday, 11 January 2009

Voxel track ballast

Here's a quick idea I had taking the previously discussed voxel technique and applying it to the ballast in Rail Simulator. This creates a more realistic looking '3D' ballast, especially if you notice the area around the sleepers where you can even make out individual stone chips.

Here's a simple animated GIF to show the ballast with and without the voxel effect applied. In the following example, I've only created the voxel effect around the sleepers (and hence why it's the only area of the ballast that changes in the image). Obviously if this was going into a route, I'd apply the voxel effect to the entire ballast section.

Friday, 9 January 2009

How to...Create Voxels

Over the years, I've always been fascinated by Voxels.

Many moons ago, before the time when 3D engines could render a gazillion multi-layered triangles per second, things were pretty basic. 3D terrain would always look flat, basic and angular. At the time, Voxels were used as a neat way of adding detail (roughness) to an otherwise flat polygonal landscape. See these examples over at Eric Chadwick's site.

Here is something that I was playing with a while back (but I think it's relevant to show it on here). This technique does NOT use actual voxels, but is similar in appearance.

Initially I mocked up the technique in 3DSMax to test how it would work. Below shows two simple quads, the first with a simple grass texture (which we will call the base layer), and the second quad with the same texture but this time with areas removed using simple transparency (which we will call the voxel layer).

Now imagine taking that base layer to represent the terrain, and stacking lots of those voxel layers on top of one another to form a column.

If small gaps are placed between the vertical spacing of these voxel layers, when looked from this angle it's easy to fool the eye into thinking that these elements are connected. This simple illusion allows this technique to work.

This technique can be applied to almost any surface, even spherical. When considering a spherical surface, the voxel layers are actually concentric spheres increasing in radius. Remember in 3DSMax, the 'PUSH' modifier can be used to create these layers.


Here is a little scene I created in Max, to demonstrate how those simple 'faked' voxels can easily be created in any 3D engine. Using multiple layers of polygons and transparency, this cute effect can be created.

Wednesday, 24 December 2008

Cablecar update

The super-deformed cablecar is now built, unwrapped and textured. The thing I'm enjoying most about this art style is the speed at which assets can be created. Low resolution models and low resolution textures also speed up working in Max, and because of the small amount of data, loading the assets in-game in speedy too.

Who needs next-gen ;)

Tuesday, 16 December 2008

Cablecar network

I starting thinking about the 'track network' for the cablecars. I'll only need a single cable to hang the cars off, so the track loft cross-section will be a simple circle.

Here you can see the track loft (the cable), with the cable supports positioned using the middle geometry function in the track loft.

I've also played with the shape of the cable car to make it look more deformed.